標題:Title:
自製風力發電機Building a wind turbine
主題及重點:Unit: 主題三:互聯相依的當代世界
學習重點7:認識可持續發展
學習技能:Learning skill:
立體打印3D printing
micro:bitmicro:bit
ArduinoArduino
DIYDIY
學習範圍:Learning areas:
 風力發電機的發電原理
Working principle of generating electricity from a wind turbine
風力發電機的發電原理
Working principle of generating electricity from a wind turbine
 用3D打印製作風力發電機,並用micro:bit或Arduino來量度電壓
Use 3D printing to make a wind turbine, and use micro:bit or Arduino to measure the voltage generated
用3D打印製作風力發電機,並用micro:bit或Arduino來量度電壓
Use 3D printing to make a wind turbine, and use micro:bit or Arduino to measure the voltage generated
 設計和製作風力發電機
Design and make a wind turbine
設計和製作風力發電機
Design and make a wind turbine
 計算功率、電壓和電流
Calculate power, voltage and current
計算功率、電壓和電流
Calculate power, voltage and current
前言Introduction
科技水平提升有助開發多種潔淨而可靠的能源,如太陽能、生物質能等可再生能源,而風力發電機亦可以把空氣的動能轉換成電能,減少對化石燃料的依賴。
透過自製「風力發電機」的活動,可以整合學生的科學知識、技能和創意,並反思哪些因素可推動環境的可持續發展。
基礎知識
可持續的自然資源和環境,是社會發展的首要條件。故此,在發展的同時,須考慮環境的承受能力,確保自然資源可持續地滿足當代人和後代的生存需要。人類過去依賴化石燃料,如煤、油、天然氣等,燃燒化石燃料釋放大量的溫室氣體,造成氣候變化、環境污染等問題。另外,化石燃料的儲量有限,為了確保後代的生存需要,各國積極研究開發潔淨而可靠的能源。風力發電是其中一種可再生能源。風力發電站內有很多風力發電機,當有風吹動時,它們的風車葉便會轉動,從而推動發電機產生電力。
科學概念
如何利用磁石和銅線來發電?How can we generate electricity by using magnets and copper wire?
把導電體(例如銅線)放置在一個改變的磁場中,會產生電壓。我們可以把轉動的磁石放在銅線中,便能製作一個簡單的發電機。發電機的電壓隨着以下因素增加:
When a conductor (like a copper wire) is placed in a changing magnetic field, a voltage is generated. We can simply make a generator by rotating a permanent magnet inside a copper coil. The voltage generated increases with:
- the rotating speed of the magnet
- the strength of the magnet
- the number of turns of the coil
設計與製作
方法一
建議材料及工具︰
| 大膠樽 |
1 |
| 飲管 (~5 cm) |
2 |
| 紙皮 (10 cm × 10 cm) |
1 |
| 紙皮 (4 cm × 3 cm) |
1 |
| 環形磁石 |
2 |
| 球形磁石 |
1 |
| 竹籤 |
1 |
| 小功率LED |
1 |
| 銅線 |
1 |
Materials required:
| large plastic bottle |
1 |
| straws (~5 cm) |
2 |
| cardboard (10 cm × 10 cm) |
1 |
| cardboard (4 cm × 3 cm) |
1 |
| ring magnets |
2 |
| ball-shaped magnet |
1 |
| wooden stick |
1 |
| low-power LED |
1 |
| copper wire |
1 |
製作步驟︰
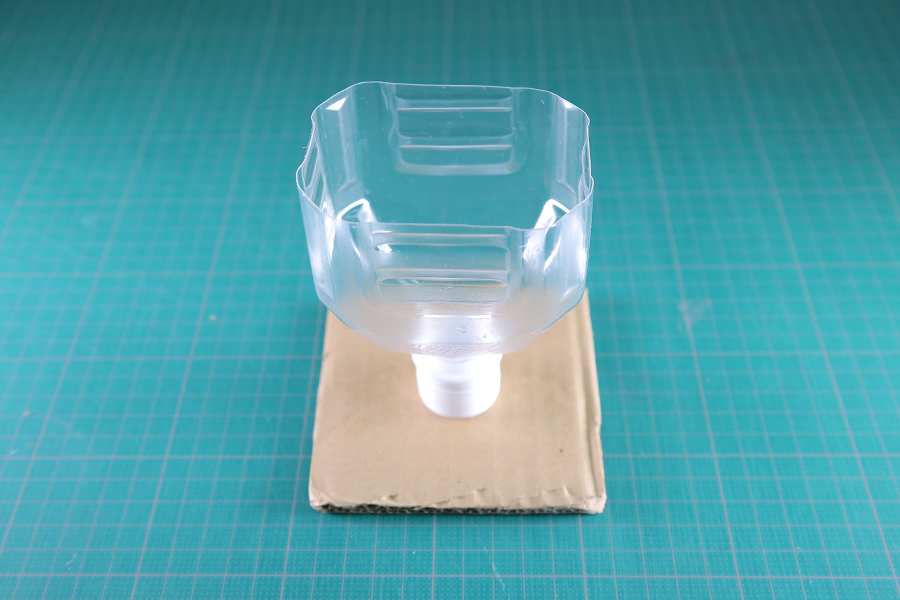
1. 把大膠樽的上半部分(距離樽蓋約15 cm)𠝹開。用膠水把樽蓋固定在紙皮上。
1. Cut the upper part off from a large plastic bottle (about 15 cm from the cap). Glue the cap to a large piece of cardboard.
2. 把最少450匝的銅線繞在膠樽的樽蓋上,並在兩端留下約10 cm的銅線。
2. Wind at least 450 turns of copper wire around the cap of the bottle. Leave about 10 cm at both ends.

3. 用砂紙磨去兩端銅線上的塗層,並把小功率LED連接至銅線上。
3. Use sandpaper to rub away the coatings at the two ends of the wire and connect these two ends to a small LED.
4. 在膠樽的兩邊各鑽一個小孔,並分別插入一支飲管。
4. Drill a hole on both sides of the bottle and insert two straws into the holes.
5. 用一支竹籤把一塊小紙皮懸掛在樽內。
5. Use a wooden stick to suspend a small piece of cardboard inside the bottle.
6. 輕輕把一個球形磁石放在樽蓋內。
6. Gently drop a ball-shaped magnet into the bottle cap.

7. 把兩塊環形磁石固定在紙皮的兩邊。
7. Fix two ring magnets to both sides of the small cardboard.
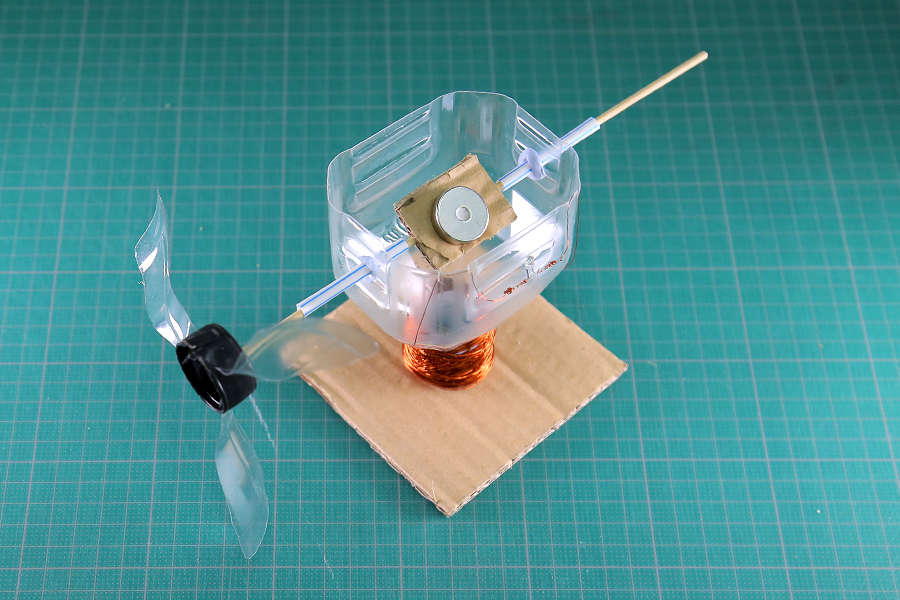
8. 把你設計的扇葉連接至竹籤。你已製成一個風力發電機!
8. Design and attach your wind blades to the stick. A DIY wind turbine is done!
方法二
建議材料及工具︰
| 海綿 (3 cm × 3 cm) |
1 |
| 竹籤 |
1 |
| 卡紙 (4 cm × 16 cm) |
1 |
| 3D打印扇葉 |
1 |
| 圓柱形磁石 |
2 |
| 小功率LED |
1 |
| 紙杯 |
1 |
| 銅線 |
1 |
Materials required:
| sponge (3 cm × 3 cm) |
1 |
| wooden stick |
1 |
| cardboard (4 cm × 16 cm) |
1 |
| 3D-printed wind blade |
1 |
| cylindrical magnets |
2 |
| low-power LED |
1 |
| paper cup |
1 |
| copper wire |
1 |
製作步驟︰
附加資源Further resources
3D打印3D printing
如果學校有3D打印機,老師可以在我們的網站下載可供3D打印的模型檔案。如果學生會使用3D製圖軟件(例如Blender),更可以讓他們改良和設計自己的3D打印模型。
You can download the file of the model for 3D printing from our website. If students are familiar with 3D graphic tools (e.g. Blender), you can also let them modify and design their own models.
micro:bitmicro:bit
把micro:bit轉換成伏特計Turning a micro:bit into a voltmeter
We can use micro:bit to measure the voltage generated by a fan.
透過使用micro:bit,量度每個風力發電機產生的電壓,看看哪組的設計能產生出最大的電壓吧!
By using micro:bit, measure the voltage generated by each wind turbine. Let’s see the design of which group can generate the largest voltage!